Sherrys Stampin' Room: October 2012

Monday, October 29, 2012

Stampin' Up!s newest KIT!!!

Fancy Friends Kit Item #132319  Price $15.95

 
Our Pick-A-Project winner!
Everything you need to send a quick note to your friends! Includes the product listed below:
* Delicate Doilies Stamp Set (wood-mount; only one image)
* Sweet Essentials Stamp (wood-mount; only “friends” image)
* Daffodil Delight Cardstock flower pieces
* Old Olive Cardstock flower pieces
* Daffodil Delight Stampin’ Spot
* Old Olive Stampin’ Spot
* 6 Whisper White Note Cards; Envelopes
* Rhinestone Basic Jewels

--you will need some glue dots to finish this CUTE project!
::ORDER YOURS HERE::
and, don't forget to check out the CLEARANCE RACK while you are there!
 
Thanks for your visit! I hope you become a Follower of my blog!
Order ONLINE 24/7

Monday, October 22, 2012

5 years!!! Yay Me!

WooHoo! Lookie what I got in the mail today!
I have had SO much fun with my Stampin' Up! experience!! I {heart} Stampin' Up!
Thanks for your visit!

Friday, October 19, 2012

CLEARANCE RACK UPDATED!!!!!!!!!!!!!!


SQUEAL!!!!!
Stampin' Up! just updated the
 CLEARANCE RACK!!!!!!
BIG SHOT DIES!
12 x 12 paper
Embellishments, incluing the keys, etc!
Envelopes
CD with DSP/embellishment content!
WHEW!!!
Christmas just came 2 months early!!!!!

Thanks for your visit!

Thursday, October 18, 2012

Yes! I Can!

Can you???
Here's another fun Halloween card I made to send to a few friends!
 
I hope it makes them laugh!
I am entering my card in my VERY FIRST BLOG HOP!
 
~~Make something that means something~~
Thanks for your visit!

Wednesday, October 17, 2012

50th Birthday Card for my brother

Man, this was tough! My brother hates his birthday, and, always 'hibernates' on his birthday. My other brother and I wanted to do something for a surprise birthday, this year, for his 50th, but, were kinda scared to! LOL Anyway, he is going on a trip to Mexico for his birthday this year, and I needed to get a card for him ahead of time....This is what I came up with...
I popped everything up with dimensionals.
I stamped the inside and used some DSP, from the front, also.
Can you see that I put Crystal Effect on the 50?
Afterthought: it would have been nice to have embossed that and then, colored in the numbers. Next time! LOL
~~Make something that means something~~
Thanks for your visit!

Tuesday, October 16, 2012

So.....what IS Stampin' Up???

I get this question alot. So, here it is, in a nutshell!
Click the logo to see what it is!
Please consider joining my group of awesome ladies.
I promise it will be FUN and EDUCATIONAL!
All you have to do, click the JOIN MY TEAM link at the top of this page. You can sign up, no matter where you are in the USA.
And, do it all online!
(You can even run your entire business online, if you choose to!)
Our free, DEMONSTRATOR ONLY website, Stampin' Connection, has well over 350,000 projects to CASE (copy and share everything), or use for inspiration, using ONLY Stampin' UP! color-coordinated products! That makes it SOOO easy, and, takes alot of the fear of crafting out of the picture.
Your $99 kit is totally customizeable to what YOU need....no duplicating what you already have for your papercrafting! AND, you get $125 in merchandise for $99--no shipping fees, either--just your local tax.
I love the fact that ALL the Stampin' Up! products I buy are TAX DEDUCTIBLE!!
Who knows, this could be just what you were waiting for!
There really is NO reason not to give Stampin' Up! a try.
No obligations, if you don't LOVE it!
I am in LOVE with Stampin' Up!
Thanks for your visit!

Thursday, October 11, 2012

HOLIDAY ORNAMENT TUTORIAL

Stampin' Up! Holiday Ornament - Q&A

 
Q: I love the ornament featured on the front of the Holiday catalog.
How do I make it?
A: That ornament is all the rage in the stampin’ world! This month, you can receive the Festive Paper-Piercing Pack with our Christmas Gift Promotion.

You’ll be surprised that you can create such a beautiful ornament from paper. It takes a bit of time, but is actually pretty simple to do. And it makes a great gift.

Here’s how!

SUPPLIES:
• Ornament Keepsake stamp set (#128048 wood, #128051 clear)
• Holiday Ornaments Framelits Dies (#127816)
• Big Shot (#113439)
• Cherry Cobbler Classic Ink Pad (#126966)
• Old Olive Classic Ink Pad (#126953)
• Very Vanilla card stock (#101650)
• Simply Scored Scoring Tool (#122334)
• 1-3/8” Circle Punch (#119860)
• 3-1/2” Scalloped Tulle Ribbon (#127841)
• Multipurpose Liquid Glue (#110755)
• Vintage Faceted Designer Buttons (#127555)
• Large Pearl Basic Jewels (#125577)
• Linen Thread (#104199)
• 1/8” Taffeta Ribbon or other ribbon for hanging ornament
• Rosette Die (#125594)
• Candlelight Christmas Designer Series Paper (#126901)
• Silicone Craft Sheet (#127853)
• Bone Folder (#102300)
• Hot Glue Gun and Glue
Step 1: Stamp 20 of the larger ornament images on Very Vanilla
card stock with Old Olive ink. Cut out with the coordinating Holiday Ornaments Framelits Die using the Big Shot. Stamp 20 of the small ornament images on Very Vanilla card stock with Cherry Cobbler ink. Cut out with the coordinating Holiday Ornaments Framelits Die using
the Big Shot. Score 15 of each ornament in half from top to
bottom using the Simply Scored Scoring Tool.
Fold in half along the score line.

Step 2: Use the Multipurpose Liquid Glue to adhere three of the
scored ornaments together. Adhere one half of the first ornament
lined up with one half of the next ornament and then do the same
with the third ornament. Leave one half of the first and last
ornaments un-glued. Repeat the steps until you have created
5 sets of the 3-ornament groupings in each ornament style. Add Multipurpose Liquid Glue to the halves of the first and last
ornaments in the 3-ornament grouping. Adhere to the back of
an un-scored ornament of the same style. Repeat for all 5 sets of
each style.

Step 3: Punch a circle from scrap card stock using the 1-3/8” Circle Punch. Place the circle on the Silicone Craft Sheet. Add a line of
hot glue around the edge of the circle. Position the necks of the
larger Old Olive ornaments, flat side down, evenly around the circle. Press into the hot glue. Use the Bone Folder to avoid burning
yourself. Nest the smaller ornaments with the larger ornaments.

To finish up, add Tulle Ribbon and linen thread, and create a rosette
to add to the center of the ornament with the clear button using
hot glue. Punch a hole for ribbon at the top.
Optional: Add Dazzling Details Stampin’ Glitter or
Champaign Shimmer Mist to add sparkle to the finished ornament.
I hope you make some of these! Once you make one, you will
be inspired to do different things with them.
Christmas is right around the corner!

If you are local, and would like to have a PRIVATE PARTY with your friends, we could make them at that time! Call me for more details!
You can also ::order any of these items on my WEBSITE::

 ~~Make Something That Means Something~~
Thanks for your visit!

Wednesday, October 10, 2012

Fall Thank You Card

Isn't this a nice Fall THANK YOU Card??
Or, you could alwasy use a different sentiment.
This would also be a nice Masculine Fall birthday card.
Here's the Supply List for it. And remember, you can

Thank You card

Stamps
• Sassy Salutations
• Wonderfall

Paper
• Cajun Craze Cardstock
• Early Espresso Cardstock
• Old Olive Cardstock
• Soft Suede Cardstock
• Summer Starfruit Cardstock
• Very Vanilla Cardstock
• Core’dinations Cardstock

Ink
• Cajun Craze Classic Stampin’ Pad®
• Early Espresso Classic Stampin’ Pad
• Old Olive Classic Stampin’ Pad
• Soft Suede Classic Stampin’ Pad
• Summer Starfruit Classic Stampin’ Pad

Stampin’ Up! Accessories
• Linen Thread
• Naturals Designer Buttons
• Stampin’ Dimensionals®
• Core’dinations™ Dust Buddy
• Large Oval Punch
• Stampin’ Sanding Block
• Big Shot™
• Autumn Accents Bigz™ Die
• Woodgrain Textured Impressions™ Embossing Folder
 
Well, I am outta here. My downline, Jennifer, gifted me with 53 pounds of golden delicious she picked out of a tree for me, early this morning! LOL So, I am off to check my applesauce in the crockpot...tomorrow will be more applesauce, and, some apple pies for the freezer! Are these apples ever delicious!!! We've had a BUMPER crop of apples in our area this year! I don't recall, in all of the 29 years that we've lived here, of an apple crop like this. AWESOME!!!
~Make Something That Means Something~
Thanks for your visit!

Tuesday, October 9, 2012

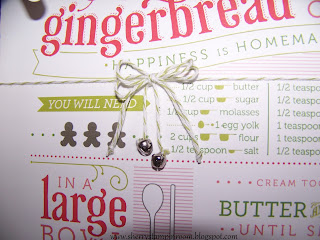
GINGERBREAD, Anyone??

Oh! More of the FUN FRAMABLE stuff!
LOVE!!!
This fun, framable art, was a TUESDAY DIGITAL DOWNLOAD, from September 18th, 2012.
::Here is the link to see all about it::
Can you believe ALL of it is only $2.95?!?!
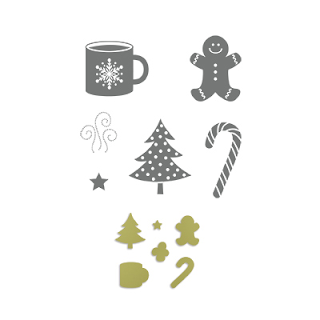
Including lots of stamp images!
I added some LUCKY LIMEADE BAKERS TWINE, Item #125572, by running a single row around the top part, added a bow, and attached 2 cute {retired} itty bitty jingle bells.
 I also added some Crystal Effects to the large green bowl.
I also added some of the Pearl Basic Jewels, Item # 119247, you'll have to enlarge the big pictures to see placement of those.
So, I thought my framed image looked bare, so, I played around with some Scentsasonal Season framelits/stamps bundle, and, added some around the edges of the frame...I am very undecided on what I like. If you have any opinions or ideas, please let me know.
or......
or......
The framed piece sets back into this Craft Frame, so, I could even do something within that inch area??
I also used this Frameable Art set to make cards with, but, I'll show you those in another post, after I send them out!
I have another FRAMED ART project ::HERE::
Scentsational Season Wood-Mount Bundle, Item #129945 Price: $36.95
Purchase the Scentsational Season Stamp Set and Holiday Collection Framelits Dies together. Priced to save you 15%!

{Make something that means something}

Thanks for your visit!

Monday, October 8, 2012

It's BOO time!

These projects were SO MUCH fun for me!
I used to do alot of this type of 'crafting',
before I found Stampin' Up!
The main image is a DIGITAL DOWNLOAD,
from Stampin' Ups MY DIGITAL STUDIO.
I LOVE this type of Subway Art!
I chose to do these in WORD, rather than MY DIGITAL STUDIO.
Stampin' Up! has NEW digital downloads EVERY Tuesday!
This download was actually found in the new
More info to follow the pictures. BUT, it's ONLY $3.95!!
I always like to decorate the envelopes, also. This one was dry embossed with the SPIDERWEB EMBOSSING FOLDER, item #120889. I {heart} my BIG SHOT! I also used my sponge with Basic Black ink, to smudge the edges and bring the web to life!
Can you see the Googly eyes and Crystal Effects on the pumpkin?
It gives a nice added texture, and, keeps the card not so flat.
 
I sized these down, to use them on 3 x 3 Thank You cards.
I think I was able to get 12 on an 8 1/2" x 11" piece of Whisper White cardstock!
That's the beauty of the DIGITAL DOWNLOADS! You can scale them to whatever size you would like to work with. I printed out the image on 8 1/2" x 11", but, haven't decided how I'm going to use that one yet!
 
Toxic Framable Designer Template Item #128139 Price: $3.95

Download includes a framable décor designer template (8-1/2" x 11") and a 34-piece stamp brush set.
Features: digital-exclusive; framable Halloween décor that you can customize to suit your style; easy to create coordinating projects with all included elements.
Coordinating colors are Basic Black, Basic Gray, More Mustard, Tangerine Tango, and Very Vanilla.

Stampin' Up! is offering a FREE 3-day trial of MY DIGITAL STUDIO. If you are interested, please check it out!
~Make something that means something~
Thanks for your visit!

Sunday, October 7, 2012

CHRISTMAS KEEPSAKE BOX

Christmas Keepsake Special Offer Item # 129024
Price: $11.97, (WAS $19.95) NOW--$14.50 with tax and shipping!!
LINK TO ORDER:
Who knew you could capture the spirit of Christmas in a box? That's just what you can do with the exclusive Christmas Keepsake Box kit from Stampin’ Up! The completed box is perfect packaging for a gift that will never be forgotten, and the kit itself can be the perfect gift for your favorite crafter! The kit comes with almost everything you need precut for just $19.95, and includes instructions to help you make it.
Christmas Keepsake Box kit contents:* Keepsake box
* Scallop borders (cut using Tasteful Trim Bigz XL Die. Includes First Edition Designer Series Paper (3) and Holly Berry Designer Series Paper (6))
* First Edition Specialty Designer Series Paper strip (2)
* Holly Berry Designer Series Paper piece
* Real Red Top Note (cut using Top Note Bigz Die)
* Real Red Decorative Label (cut using Matchbook Bigz XL Die)
* Wild Wasabi Card Stock strips (3)
* Naturals Ivory Card Stock piece
* Holly Berry Bouquet Designer Fabric (cut to length)
* Real Red 1-1/4" Striped Grosgrain Ribbon (cut to length)
* Real Red 5/8" Grosgrain Ribbon (cut to length)
* Victoria 5/8" Crochet Trim (cut to length)
* Linen Thread (cut to length)
* Champagne Fine Galaxy Stampin’ Glitter—a whole container—$5.00 approximate value
* Vanilla Pearl 1/2" Simply Adorned Bauble--$3.95 value

* Pearl Basic Jewels (1 pkg.)—$4.95 value* Holly Berry Bouquet Designer Buttons (1 Large Wild Wasabi and 1 Small Real Red)
* Mini Vintage Tag

If you order this, let me know, and I will send you some pictures of other ideas to decorate this cute box! 4th of July, Birthday....
These are on the CLEARANCE RACK, and won't last long!!!
Get a few of your friends together to make these!

Thanks for your visit!

Friday, October 5, 2012

Origami Ornament Tutorial VIDEO

I have another tutorial for you!
I saw these cute ornaments, and HAD to make some!
Enjoy! I hope you make some cute ones!
Please let me know, if you do!

**Double Click the video, and, it should open up larger for you**
Here's a few pictures of the projects I showed you in the video.
 
 
Thanks for your visit!

Thursday, October 4, 2012

CHRISTMAS CARD CLASS in-the-mail

Have you thought about your Christmas cards yet?
I have an easy solution for you!
I have a CHRISTMAS CARD CLASS I can mail you!
All you need for this is your glue.
Everything comes precut, and you'll have a length of ribbon to cut (2 colors) and use.
16 cards AND envelopes, $30 plus shipping (email me for the total).
These are very easy, but, SO CUTE!
You will only need 1 stamp to mail each of these cards, too!
Email me ::HERE::  to order your set!
Thank you for your support!

Thanks for your visit!

Tuesday, October 2, 2012

Sunflower Card Tutorial

I made a video showing how to make a cute sunflower card.
I hope you like it, and, that it inspires you to make a few sunflowers, too!

And, here's a few pictures of the completed card.
 

Thanks for your visit!

Monday, October 1, 2012

Mini Sunflower Tutorial

Lookie what I found for you today!
A mini Sunflower tutorial!
Thanks for Linda for sharing this!
You can order any of these items,
see the list below, on my webstore site:
www.sherrystampinroom.stampinup.net
HERE'S HOW:
1) Punch two flowers with the Boho Blossoms Punch.
2) Punch one center with the 1/2" Circle Punch.
3) On one flower, snip between each petal with the Paper Snips.
4) Place a Stampin' Dimensional on top of the first flower.
5) Place the snipped flower on top of the plain flower.
6) Add the center.
7) Bend every other petal upward.
8) Add green foliage. Little Leaves Sizzlit used here.
SUPPLIES & ACCESSORIES:
Summer Starfruit Card Stock #126839
Old Olive Card Stock #100702
Early Espresso Core'dinations Card Stock #127848
Boho Blossoms Punch #119858
Paper Snips #103579
1/2" Circle Punch #119869
Little Leaves Sizzlit #114511
Stampin' Dimensionals #104430
 
Sunflowers are definitely showing their faces around here!


Thanks for your visit!
Related Posts with Thumbnails